Restoration template#
A restoration parameter template consists of a number of options which provide Huygens Core with information on the restoration procedure. To get a preview of the template contents select the template, the contents will be displayed on the right panel.
Note
When editing a template help links  are displayed at
key locations to point you to specific articles of the SVI-wiki.
are displayed at
key locations to point you to specific articles of the SVI-wiki.
Deconvolution algorithm#
From HRM 3.7 onwards it is possible to select one deconvolution algorithm per image channel. In most cases this will not be necessary and the user will likely find it convenient to deconvolve all the image channels with the same deconvolution algorithm.
For each channel choose one of the deconvolution algorithms from the corresponding drop down widget.

The available choices are:
Classic Maximum Likelihood Estimation (CMLE): CMLE is the method of choice under most circumstances. In case of doubt, CMLE should be used.
Quick Maximum Likelihood Estimation (QMLE): QMLE is faster than CMLE, but gives slightly less precise solutions in some cases. One may consider using QMLE in compute-intensive situations, for example, when deconvolving widefield 3D-time series.
Good’s roughness Maximum Likelihood Estimation (GMLE): GMLE is a good alternative for high-noise images, such as STED or confocal.
Skip : for not deconvolving this channel and keeping the raw data instead.
Note
Skip all channels of an image to use HRM as a pure batch file converter, chromatic aberration corrector, time stabilizer, colocalization analyzer, etc.
Signal to Noise ratio#
In the Huygens Software the Signal-to-Noise ratio (SNR) is treated as a regularization parameter, i.e., a means to control the sharpness of the deconvolution result.
Yet, please be aware of the effect of extreme SNR values on image deconvolution: too high SNR values can produce restoration artifacts; too low SNR values can lead to smooth structures.
Note
After a little practice it is possible to assess the SNR range for deconvolution visually. In general, the SNR should increase with the quality and amount of signal of the raw data.
There are different acquisition settings that have an impact on the quality of the recorded signal. Changing these in the acquisition system will most likely require a modification of the SNR value for deconvolution. These acquisition settings are:
Gain / offset
Time exposure / scanning velocity
Summing / averaging
Laser power
Spectral detection range
Because these settings are typically different for each channel HRM will require an SNR value per channel, like this:
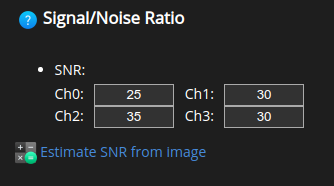
As a guide, these are typical SNR values for different microscopy tecniques:
Confocal: between 20 and 40.
STED: between 10 and 20.
Widefield: between 40 and 60.
HRM offers an automatic SNR estimator to determine suitable SNR values for
the raw images. Click on  to use the SNR estimator.
In a new page you will be asked to select an SNR estimation method.

The Auto method gets good estimations on images without a baseline. When working with images that contain a baseline the Legacy method can be used instead.
Next, select an image representative of the batch selected in Select images (1/5).
Press  for the SNR estimation:
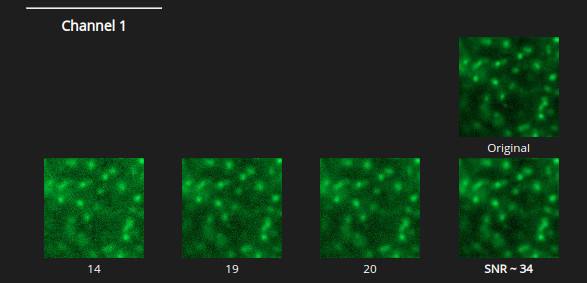
The output of the SNR estimator shows a region of the original data next to 4 different noise simulations of the same region. In bold letters the SNR of the simulation that most resembles the original image.
By pressing  the estimated SNR values are copied into the
restoration parameter template.
the estimated SNR values are copied into the
restoration parameter template.
Acuity#
As of HRM 3.8 the acuity parameter controls the sharpness of the result.
In older Huygens and HRM versions this could be controlled by setting lower or higher than expected Signal to Noise ratio values for the image.
If you would like to keep working like in the older versions simply set the acuity mode to legacy:

For integrating the acuity parameter in your workflows and to leave the legacy mode behind enable the acuity mode and set acuity values for each channel. The accepted values range between -100 and +100.

Positive acuity: the more positive the acuity, the sharper the result and the less noise suppression (or potentially noise amplification).
Negative acuity: the more negative the acuity, the more noise suppression and the less sharpness.
Crop image#
HRM can intelligently crop your images without losing important data.

Select from:
Apply conservative crop: to save computation time.
Do not crop the image: if computation time is not an issue.
Note
The time needed to deconvolve an image increases more than proportionally with the image volume. Thus, cropping the image will speed up its restoration and the processing of the HRM queue.
Bleaching Correction#
Huygens can automatically estimate the amount of bleaching in the image and correct for it. This type of correction is mostly necessary for 2 types of images:
Images from widefield-like systems. Since the specimen is exposed to large amounts of light it can be easily bleached.
Time series from any type of microscope. Depending on how long the time series is the specimen can also be exposed to large amounts of excitation light.
Note
2D/3D images froms confocal-like systems (no time series) don’t need to be corrected for bleaching.
When presented with the Bleaching correction option, it is recommended to select

for any time series and/or widefield-like images.
Select

for all of the other images.
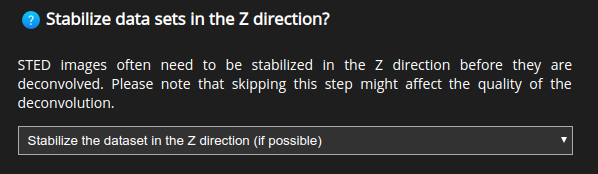
Stabilization in Z#
This option will only be shown when restoring STED images (including STED 3D). Due to the high lateral resolution in STED, image acquisition in more sensitive to drift in STED than in other microscopy modes.
Note
It is strongly recommended to select Z stabilization on STED images.
The stabilization is performed before deconvolution. This significantly improves the restoration results.
Z stabilization is also recommended on STED 3D images although Huygens can automatically skip it depending on the PSF shape of each particular case.
Array Detector Reduction Mode#
This option will only be shown when restoring Array Detector images (Airyscan, SPAD, etc). Array Detector images contain one acquisition per detector. The user can tell Huygens how to combine the data from all the detectors for deconvolution.
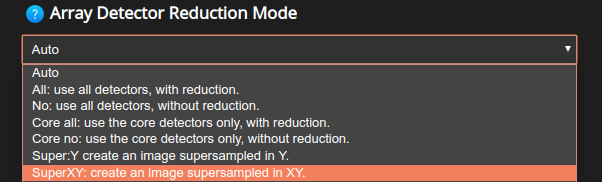
The following options are possible:
All: the images from all detectors are centered and combined, thus increasing the SNR. The resulting, combined image is then deconvolved.
No: the independent detectors are not combined prior to deconvolution. They are used as separate inputs of a ‘parallel’ deconvolution.
Core all: Same as All but taking into account the central detectors only.
Core no: Same as No but taking into account the central detectors only.
SuperY: Create an image with 4 times as many samples in Y. This is mostly useful when dealing with images recorded with the Zeiss Airyscan in fast mode.
SuperXY: Create an image with double the samples in X and Y. Thus, producing an image with 4 times more samples. This is a good option when dealing with images that have been acquired well under the Nyquist sampling rate.
Auto: Automatic selection of one of the above mentioned modes depending on the microscopic parameters and detector model of the image.
In all cases the SNR value specified in Signal to Noise ratio is for the central detector. Huygens will scale the SNR for the combined detectors automatically.
Background mode#
The background intensity is a nearly constant value that is present everywhere in the image.
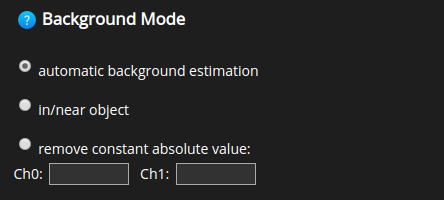
Three options are available for background correction. These options can return slightly different values, therefore this choice can affect the deconvolution result:
Automatic background estimation: This estimation usually works well. The background is estimated within a region with a low mean value.
In/near object: The background is estimated around intensity peaks. This option can be interesting, for example, when having bright little objects in a cell with a strong cytoplasmic background.
Remove constant absolute value: To make sure that the same background level is removed from all the images in the batch, insert manually a measured mean background for each channel. This option is typically useful for those interested in doing fluorescence quantification or stitching.
Stopping criteria#
The restoration algorithms offered in HRM, CMLE, QMLE, and GMLE, are iterative methods. This means that the algorithms compute sequential solutions which converge to a stable result.
Deconvolution will stop when either of the following two conditions is met.
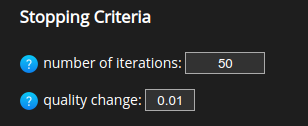
Number of iterations: sets the maximum number of iterations that Huygens will compute.
Quality change: how much the results of two consecutive iterations differ. If two subsequent results differ less than this factor then convergence has been reached.
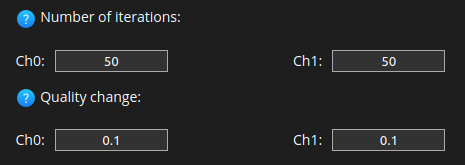
As of HRM 3.9 it is possible to set the stopping criteria seperately for each channel. Leaving later channels empty will use the last set value.
Chromatic Aberration Correction#
This option will only be shown when restoring multi channel images. In order to let HRM know that an image batch contains multi channel images please set the number of channels correctly, as explained in Number of channels.
The restoration template editor contains a section for post-deconvolution operations. Options for these operations (chromatic aberration correction and stabilization of time series) only show up when applicable, i.e, multichannel images and time series.
Therefore, the following section will only be displayed when restoring multi channel images:

Choose a reference channel:
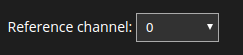
The chromatic aberration can be described by an x-y-z shift + rotation + scale (zoom) of each channel with respect to the reference channel. Therefore, by definition the reference channel has no x-y-z shift, rotation or scale. For the other channels, type in the shifts, rotations and scales.

The table will contain one entry per channel.
For an accurate estimation of the chromatic aberration one can use a local installation of Huygens Professional or Huygens Essential, see Chromatic Aberration Corrector.
Use the estimated x-y-z shifts, rotations and scale values reported by Huygens Professional or Essential to fill out the table. All images recorded with the same settings and the same microscope can be corrected with the same chromatic aberration values.
As of Huygens 21.10.1 the Chromatic Aberration correction has an option for higher order corrections (e.g.: barrel and pincushion distortions). The description of these deformations can be imported into HRM from the corresponding Huygens template. However, due to the complexity of the parameters they can’t be either edited or viewed in HRM.
HRM 3.8 and higher will let you choose between the higher-order correction and the 5 parameter correction (x,y,z, rotation, scale) when importing templates from Huygens. Please do keep in mind that the extra parameters will be handled under the hood and are not displayed in the HRM UI.
An option to edit the shifts, rotation and scale while discarding the higher-order corrections from a Huygens template will appear on importing, as follows:

Note
For skipping the chromatic aberration correction simply leave the table fields empty.
Stabilization of time series#
This option will only be shown when restoring time series. In order to let HRM know that an image batch contains time series please set the time interval correctly, as explained in Voxel Size.
The restoration template editor contains a section for post-deconvolution operations. Options for these operations (chromatic aberration correction and stabilization of time series) only show up when applicable, i.e, multichannel images and time series.
Therefore, the following option will only be displayed when restoring a time series:
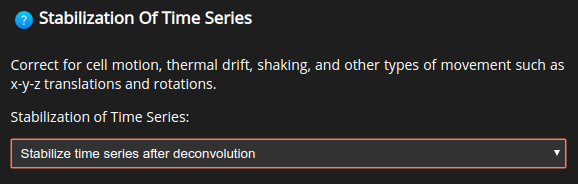
Set a stabilization method:

Center of mass: works best if the image contains a single large object. No objects should cross the image borders.
Correlation: for general x-y-z translations and axial rotations. Adjacent time frames will be compared. The software will try to find the best alignment by maximizing structural overlap.
Model based: if the geometry of the imaged object did not change much during the acquisition.
Choose whether to detect and correct rotations:

Lastly, specify the cropping mode for the resulting, stabilized time series:
Original: to crop the result to the size of the raw data.
Full: to preserve the size of the stabilized data.
Tight: to crop away large background regions.
Note
Depending on the cropping mode the dimensions of the result and the raw data will differ. This will become noticeable when comparing the data later. See Results - detailed view.
Hot Pixel Correction#
Hot Pixel Correction masks need to be created beforehand using Huygens Professional or Essential and uploaded to the Raw images folder.
Note
Multichannel masks are supported.
When presented with the Hot Pixel Correction file selection window,
![]()
browse for the mask of the camera used for the image acquisition.
![]()
Select the Hot Pixel mask and click close.
Afterwards, press save and return to the image parameter selection page.
![]()
The correction will only be applied to those images of the batch that have the same XY dimensions as the mask.
Note
This correction is optional. The selection can be left empty. Use the reset button to unselect a previously selected mask.